
A wireless dog fence can be the perfect solution if you want to give your pet plenty of freedom to play and explore while keeping him or her safe at the same time.
These invisible fences feature a number of convenient advantages that you simply cannot get with other fencing options. As compared to wired dog fencing systems, they are easier and more convenient to install.
Instead of digging trenches and burying wire, you simply position the transmitter unit in a closet, plug it in and turn it on. A wireless dog fence is also portable, allowing you to take it with you when you move or travel.
A wireless dog fence also provides a number of advantages over traditional above ground fences. Because they are invisible, they will not mar the beauty of your property. Your dog will also not be able to dig under or jump over the fence, providing greater safety for your pet.
If you’ve decided that a wireless dog fence is the perfect solution for your home and yard, it can be helpful to understand how these fencing systems work.
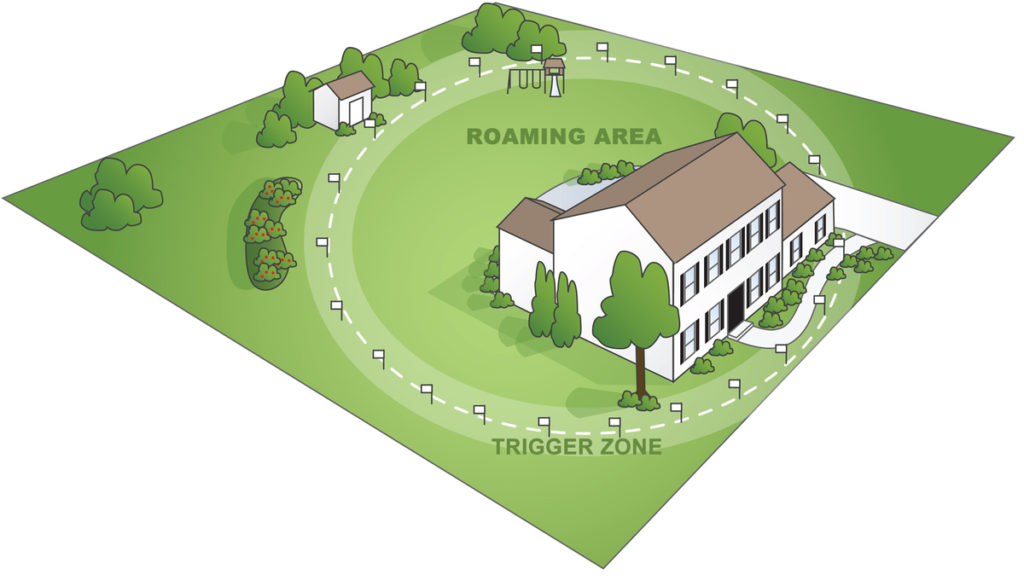
Understanding the Transmitter and Receiver
Wireless fencing systems consist of two separate components designed to work together – the transmitter and the receiver collar. The transmitter unit can be placed in an unobtrusive area such as a closet or utility room. When plugged in and turned on, the transmitter emits a signal that your dog’s receiver-collar can detect.
The Wireless Dog Fence transmitter unit can be adjusted to create a 15ft to 90ft circular area in which the signal is detectable. The receiver-collar is constantly searching for the transmitter signal, which it is able to find as long as your dog stays within the designated area.
If your dog tries to move outside the boundary area of the wireless fence, he or she will hear an audible warning signal. If your dog continues moving away, the collar will eventually lose the signal. Once this happens, the dog will receive a harmless static correction sensation. This way an invisible containment system is created with a “safe zone” that your dog will become used to.
Create a Customized “Safe Area”
Although you may find that a single transmitter unit creates an adequately sized “safe area” for your dog, this is not your only option. If desired, you can create a larger and more customized recreation area for your pet by combining multiple transmitters.
Understanding the Training Process
- Once you’ve decided upon the correct number of transmitter units and have positioned them appropriately, you’ll need to train your dog so that he or she understands the boundaries. The initial training sessions should take place with the transmitter unit turned off.
- Mark the perimeter of the “safe area” with the warning flags that come with the invisible fence. These visible flags will help your dog learn during the training process.
- Walk your dog around the boundaries on a short leash so that he or she can become accustomed to the area. After a few days, your dog will start to understand his or her limits.
- At this point, you can turn the wireless dog fence transmitter unit on to the lowest power setting. As you walk your dog around the perimeter, let him or her experience the warning signal and correction stimulation occasionally.
- Before long, your dog will simply stop and turn back whenever he or she hears the audible signal. At this point, the training is complete and the boundary flags can be safely removed. You can also turn the transmitter signal to the normal power setting.

Subscribeto get the latest dog training articles, latest offers & news.
You have Successfully Subscribed!